







A successful and effective air compression treatment process starts prior to turning on the compression pump. It includes confirming the scheduled appointment, examining the equipment and garments to be used, selecting the proper size of sleeves, positioning the patient for comfort, connecting all hose lines to allow for unimpeded flow, and setting up the machine based upon the physician’s prescription or approval. Observation, cleaning, and record-keeping complete the sequence to ensure that the equipment is prepared for the following treatment.
Consistency is important because a minor error in setup may lead to issues with comfort, chamber inflation, session time, or staff transitions. Having a written procedure provides all team members with identical check points and allows each team member to set up their own equipment and devices.
Gestalten Sie den Arbeitsablauf anhand von fünf wiederholbaren Phasen
Eine Klinik kann jede Sitzung in die Phasen Vorbereitung, Anpassung, Anschluss und Einrichtung, aktive Beobachtung sowie Rücksetzung nach der Sitzung unterteilen. Die folgende Tabelle dient eher als Übersicht für den Schichtwechsel als als Produktspezifikationsliste.
| Workflow-Phase | Hauptaktion | Erfassungs- oder Übergabepunkt |
|---|---|---|
| 1. Vorbereitung | Den Ablaufplan bestätigen und die Ausrüstung überprüfen | Benutzerstatus, Geräte-ID, Verfügbarkeit von Bekleidung |
| 2. Montage | Wählen Sie die Größe aus und ziehen Sie das Kleidungsstück vorsichtig an | Art des Kleidungsstücks, Seite, Größe, Beobachtungen zur Haut oder zum Tragekomfort |
| 3. Einrichtung | Schläuche anschließen und die zugelassenen Einstellungen eingeben | Druck, Modus, Zyklus- oder Sitzungsdauer |
| 4. Beobachtung | Komfort, Aufblasverhalten, Schläuche und Anzeige prüfen | Unterbrechungen, Anpassungen, Alarme, Reaktion |
| 5. Zurücksetzen | Anhalten, Druck ablassen, ausbauen, reinigen, prüfen und lagern | Reinigungsstatus, Schäden, Wartungs- oder Liefermaßnahmen |
| Schichtbesprechung | Vergewissern Sie sich, dass das System vollständig und betriebsbereit ist | Offene Mängel, unter Quarantäne gestellte Artikel, zu ersetzendes Zubehör |
Schritt 1: Führen Sie die Überprüfung vor der Sitzung durch
The current treatment plan for the patient in question should be reviewed first. Ensure you have confirmed the part of the body being treated; what type of garment will be worn; whether this is a single side or both sides (bilateral) setup; how long each treatment session lasts; what level of pressure/program can be used during treatment; and if there are specific areas where you should pay close attention. If the patient has experienced changes in their physical state, such as their ability to tolerate treatment, swelling, skin appearance, movement capabilities, or communication skills, then the change must go through the clinic’s assessment process prior to resuming treatment.
Überprüfen Sie die Steuereinheit und das Zubehör
- Passen Sie die Steuereinheit, das Netzteil, den Schlauchsatz und die Schutzkleidung an die vorgesehene Konfiguration an.
- Überprüfen Sie das Netzkabel, den Stecker, das Gehäuse, das Display, die Tasten und die Anschlüsse auf sichtbare Beschädigungen.
- Vergewissern Sie sich, dass die Lufteinlässe und alle vom Benutzer zu wartenden Filter gemäß der Bedienungsanleitung frei von Verstopfungen sind.
- Überprüfen Sie die Schläuche auf Knicke, Risse, Verfärbungen, lose Enden oder beschädigte Anschlüsse.
- Überprüfen Sie jedes Kleidungsstück, jede Naht, jeden Verschluss, jedes Futter, jedes Etikett und jedes Verbindungselement.
- Vergewissern Sie sich, dass die gereinigten Teile trocken sind und dass das erforderliche Zubehör vorhanden ist.
Verwenden Sie keine optisch ähnlichen Schläuche oder Kleidungsstücke, es sei denn, der Hersteller gibt an, dass diese miteinander kompatibel sind. Die bloße Passgenauigkeit der Anschlüsse ist kein Hinweis darauf, dass die Kanalreihenfolge, der Druckbereich oder das Steuerungsprogramm korrekt sind.
Den Patienten vorbereiten und die Behandlungsposition einnehmen
Provide an explanation of the sequence of events using everyday language and come to an agreement with the user regarding when they will let you know about their discomfort, or if they wish to pause the process. Position the limb or body part being treated in such a way that the garment lies flat, the tube is accessible, and the user can remain in a position that supports them during the entire treatment. The clothing worn beneath the treatment garment should be placed in accordance with the garment’s instructions, and it should remain smooth, not bunched up into areas that create pressure points.
Schritt 2: Auswahl und Anpassen der Hülse
The amount of space available in a sleeve will determine the user’s level of comfort, and how well the sleeve performs pneumatically. If the sleeve is too small it can cause the user to experience discomfort when they first try on the garment. On the other hand, if the sleeve is too large it can create wrinkles, movement of the sleeve, and/or increased air volume required to inflate the sleeve. You should always use the size chart specifically designed for the type of garment you are purchasing. Do not use measurements taken from a different style of garment to find your correct size.
Vor der Größenauswahl nachmessen
Measure the specific body parts (e.g., ankle, calf, thigh, arm, etc.) as indicated by the manufacturer, along with any relevant limb lengths. Use these measurements to determine the size for the person wearing the clothing item, both at the time they receive it and periodically if there are changes in their body shape/size. When a measurement falls on a sizing boundary, refer to the manufacturer’s instructions and test fit with an experienced professional.
Legen Sie das Kleidungsstück ohne Verdrehungen oder Lücken an
- Öffnen Sie das Kleidungsstück vollständig und bestimmen Sie dessen Ausrichtung, die Seitenmarkierung und die Kammerrichtung.
- Legen Sie das Kleidungsstück mittig auf, sodass Nähte, Reißverschlüsse oder Verschlüsse wie vorgesehen aufeinanderliegen.
- Glättet den Stoff vom distalen Ende zum proximalen Ende hin.
- Schließen Sie Riemen, Klettverschlüsse oder Reißverschlüsse gleichmäßig, ohne dabei Gewalt anzuwenden.
- Stellen Sie sicher, dass der Schlauch in die vorgesehene Richtung verläuft und nicht unter dem Benutzer liegt.
- Vergewissern Sie sich vor dem Aufblasen, dass das Kleidungsstück fest sitzt, ohne jedoch den Tragekomfort einzuschränken.
Praktischer Tipp: Place the size chart near the fitting area, and mark each cleaned garment with its type and size. Staff members should be able to tell what kind of sleeve a garment has without relying on just its color or appearance.
Schritt 3: Das System anschließen und die Einstellungen vornehmen
Schläuche verlegen und anschließen
Position the control unit on a flat, sturdy surface and make sure there are no obstructions to the ventilation openings. Position the tubing so that it will not become caught between a chair, treatment table, bed rail, footrest, or other piece of equipment that may move. Connect each connector into the correct port until the connector is fully inserted (as per the instructions provided in the owner’s manual) and verify that the tubing is neither pulled tight nor has any sharp bends.
For multi-channel systems, make sure to use the channels in the same order as they are labeled. Swapping the channels will cause either one of the chambers to inflate before the other, or may prevent the system from operating properly. If the connector has a key, do not force it into place.
Druck, Modus und Zeit einstellen
The control unit is turned on. The desired pressure, compression type, cycle selection, and session duration for this specific model are chosen. There are some models with one predetermined pressure setting, while others have settings based on chambers, preset gradients, intensity levels, or multiple sequence modes. Only those additional options which are a portion of the selected program and documented for the particular device can be utilized.
- Lesen Sie vor dem Start den angezeigten Druck oder die angezeigte Intensität ab.
- Bitte bestätigen Sie, ob der Timer die Gesamtdauer der Sitzung oder einen Zyklusparameter angibt.
- Vergewissern Sie sich, dass das ausgewählte Kleidungsstück oder der ausgewählte Kanalmodus mit dem angeschlossenen Ärmel-Set übereinstimmt.
- Ermitteln Sie die normale Absperrvorrichtung und alle im Handbuch beschriebenen Verfahren zum schnellen Druckabbau.
- Beachten Sie, ob das Gerät nach einer Pause oder einer Stromunterbrechung den Betrieb wieder aufnimmt, zurückgesetzt wird oder die Einstellungen beibehält.
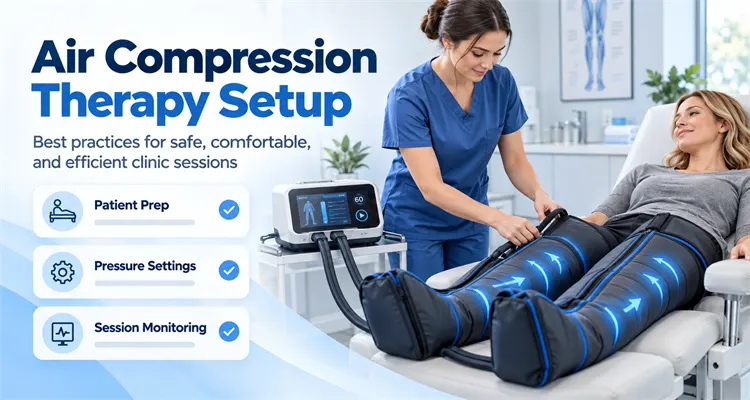
Phase 4: Beobachten Sie den ersten Zyklus und die laufende Sitzung
The first time the user inflates, you need to be there. Rather than watching the screen alone, watch the garment. When you see the chambers activate in the order they were programmed, check that all of the closures are closed and that the tubes are clear. Ask the user what it feels like to have the air pressure applied, and make sure that he/she knows how to ask for a pause if needed.
Kontrollen im ersten Zyklus
- Die erwartete Kammer beginnt sich zu füllen, und die nachfolgenden Kammern folgen der ausgewählten Reihenfolge.
- Das Kleidungsstück bleibt in seiner Position, ohne sich aufzurollen, zu verdrehen oder zu öffnen.
- Der Schlauch und der Anschluss bleiben stabil, wenn sich das Kleidungsstück ausdehnt.
- Die Steuereinheit erreicht ihren Betriebszustand, ohne dass erneut Fehler- oder Alarmmeldungen auftreten.
- Der Anwender berichtet von einem erträglichen, gleichmäßigen Druckgefühl, nicht jedoch von Einklemmungen, Taubheitsgefühlen oder lokalen Beschwerden.
Überwachung während der Sitzung
Frequency of observation needs to be in line with the clinic’s plan, the user’s ability to communicate, and the manufacturer’s directions regarding the use of the equipment. Check again for proper posture, position of garments, routing of hoses, status of displays and comfort of the user after every movement or change in settings. Users who cannot contact someone to assist them should not be left unattended at the clinic unless the level of observation required by the clinic has been met.
If the user experiences an unexpected pain, marked discomfort, numbness, breathing difficulties, changes in their skin, distress, or other concerning responses, stop the session and begin the clinic’s response pathway. If a garment comes undone, a tube becomes disconnected, a chamber does not fill properly, fluid comes into contact with electrical parts, or the control unit indicates a problem that cannot be resolved using the user manual then stop the session.
Auf Alarme in einer festgelegten Reihenfolge reagieren
- Halten Sie das System an oder schalten Sie es aus und überprüfen Sie zunächst den Benutzer.
- Lesen Sie die angezeigte Alarmmeldung oder Anzeige ab und halten Sie den Gerätestatus nach Möglichkeit im Blick.
- Überprüfen Sie den Verschluss des Anzugs, die Schläuche, die Verbindungsstücke und offensichtliche Luftlecks.
- Führen Sie ausschließlich die im Handbuch beschriebenen Bedienerprüfungen durch.
- Sollte der Fehler weiterhin bestehen, nehmen Sie das Gerät außer Betrieb, kennzeichnen Sie seinen Zustand und leiten Sie es zur technischen Überprüfung weiter.
Schritt 5: Beenden Sie die Sitzung und setzen Sie die Geräte zurück
Vor dem Ausziehen des Kleidungsstücks den Druck ablassen
Terminate the procedure using the standard stopping control and let the garment deflate. Use any manual deflation method provided by the equipment according to its operating instructions. To disconnect the tubing, hold the connection instead of pulling on the tubing, and gently open the garment while supporting the extremity as necessary.
Führen Sie die Überprüfung nach der Sitzung durch
Check the user’s comfort level and the area of treatment as per your clinic plan; then compare any of your observations prior to beginning the session with those made during the session. If you experience an interrupted session, changes in treatment settings, fitting problems, or equipment issues, be sure to document them as soon as possible so they will be fresh in your memory.
Reinigen, trocknen, prüfen und lagern
Befolgen Sie die Anweisungen des Steuergeräts und des Herstellers des Kleidungsstücks hinsichtlich zugelassener Reinigungsmittel, Einwirkzeit, Reinigungsmethode und Trocknung. Halten Sie Flüssigkeiten von elektrischen Anschlüssen fern und tauchen Sie Komponenten nicht ein, es sei denn, das jeweilige Teil ist ausdrücklich für dieses Verfahren ausgelegt. Reinigen Sie wiederverwendbare Schläuche und Anschlüsse, sofern angegeben, und achten Sie dabei besonders auf die Oberflächen, die beim Anbringen und Entfernen berührt werden.
- Lassen Sie jeden gereinigten Gegenstand vollständig trocknen, bevor Sie ihn verpacken oder wiederverwenden.
- Überprüfen Sie während der Reinigung Nähte, Kammern, Verschlüsse, Etiketten, Schläuche und Verbindungsstücke.
- Lagern Sie die Kleidungsstücke flach oder, falls erforderlich, locker aufgerollt, ohne scharfe Falten über den Luftkanälen.
- Verwenden Sie Coil-Rohrleitungen ohne enge Biegungen und schützen Sie die Verbindungsstücke vor Stößen.
- Bringen Sie die Pumpe, das Netzteil, die Schläuche und das Bekleidungsset an einen festgelegten Bereitstellungsort zurück.
- Trennen Sie beschädigte, nasse oder nicht vollständig gereinigte Gegenstände von der einsatzbereiten Ausrüstung.
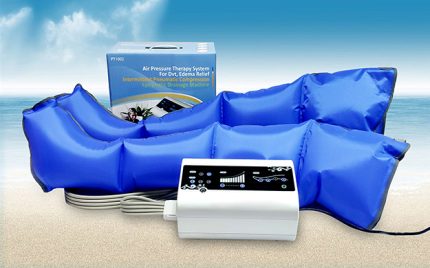
Eine übersichtliche Produktseite für Luftkompressionstherapiesysteme sollte kompatible Manschetten, Schläuche, Stromversorgungszubehör, Reinigungshinweise und Ersatzteile auflisten, damit die Klinik vollständige Funktionssätze vorhalten kann.
Verwenden Sie einen kurzen Eintrag, der die nächste Sitzung unterstützt
Die Dokumentation sollte kurz genug sein, um zuverlässig ausgefüllt zu werden, und detailliert genug, um zu erklären, was geschehen ist. Die Klinik kann die Felder an ihr eigenes System anpassen, aber jeder Eintrag sollte den Benutzer oder den Fall, Datum und Uhrzeit, Geräte- oder Inventarnummer, Kleidungsart und -größe, Körperbereich, ausgewähltes Programm, Sitzungsdauer, beobachtete Reaktion, Unterbrechungen und den Bediener enthalten.
Sitzungsnotizen von Gerätedaten trennen
Die Sitzungsakte folgt dem Pflege- oder Rehabilitationsablauf des Nutzers. Die Geräteakte bezieht sich auf das Gerät selbst: Reinigungsstatus, Inspektionsergebnis, Alarmverlauf, Schäden, Reparaturen, vorbeugende Wartung und Wiederinbetriebnahme. Indem beide Akten miteinander verknüpft, aber dennoch getrennt geführt werden, lässt sich leichter erkennen, ob ein Ereignis den Nutzer, die Einrichtung oder das Gerät betrifft.
Den Kreis bei der Schichtübergabe schließen
Before Handover, Identify Equipment that is ready for use, in process of cleaning, waiting for accessory parts, or has been removed from service. Fault Notes must contain; Device Identification, Connected Garment, Mode Selected, Visible Indication, operator completed checks, and Current Storage Location. This will prevent the next shift from having to repeat a failed setup or from placing a failed device back into service.
Daily and Periodic Workflow Checks
Not every task belongs after every session. Dividing responsibilities by frequency helps the clinic keep the workflow practical.
- Before each session: inspect the complete setup, confirm fit, settings, tubing, and readiness.
- After each session: stop, remove, clean, dry, inspect, document, and restore the set.
- Each shift or day: review open faults, ready stock, cleaned garments, and missing accessories.
- At scheduled intervals: complete filter, electrical, calibration, battery, or preventive maintenance tasks specified for the model.
- After repair or component replacement: verify function with the correct garment before returning the system to service.
Häufig gestellte Fragen
Can One Sleeve Size Be Used for Every Patient
No. The clinic should use the measurement points and size chart for each specific garment. Usually, a clinic will need to establish a planned size range and have a method to distinguish clean garments from un-cleaned garments.
Should Pressure Be Selected Only by Body Weight
The program you choose to run must align with your clinic’s protocols for the device being used, along with its specific operating procedures. You must also consider the fit of the compression garment you are utilizing, where on the patient’s body you will be treating, the level of comfort of the patient during treatment, how the patient responds to the treatment, and what you hope to achieve with the treatment. Your decision to set the device at a certain level based solely upon the patient’s weight is incorrect.
When Should the First Fit Be Rechecked
Recheck during the first inflation cycle, after repositioning, after a setting change, and whenever the user reports a change in comfort. Repeat measurement when body dimensions or swelling may have changed.
Can a Garment Be Reconnected While Still Inflated
Use the stop and pressure-release sequence stated for the device. Reconnecting under pressure can make connector handling difficult and may not restore the intended chamber order.
What Should Be Recorded After an Alarm
Record the device and garment identity, displayed indication, point in the cycle, user response, operator checks, whether the session resumed, and where the equipment was placed afterward.
Schlussfolgerung
Clinic workflow is completely connected by the preparation of equipment, proper fitting of equipment on the patient, setting adjustments, observing the patient while using the equipment, cleaning the equipment after use, and documenting all data collected. The stages are dependent upon each other as they provide protection to the next stage. Proper sizing will result in a predictable amount of pressure being applied to the patient. Proper routing of the hoses will allow for the correct order of chambers to inflate. Observation of the first cycle can identify problems that may have occurred during the initial setup of the equipment. Documenting after each treatment session can prevent unresolved issues from affecting the next appointment.
The most useful procedure is one that staff can repeat without guessing. Keep model instructions accessible, organize garments and accessories clearly, use the same stop-and-check order for abnormalities, and finish every session with a confirmed equipment status.